In such a scenario, the importance of additional RAM cannot be overstated. While more storage space gives you more photos, more MP3s, or more video clips, additional RAM helps the processor to work more quickly, thereby helping in the playback (or even creation) of such files. In this article, we provide you tips will help you to increase RAM on your Android device. Method 1: Divide Your SD Card To Increase RAM On Android In order to increase RAM on Android device, given below are the requirements:
Rooted smartphone Or rooted tablet SD card (4 or higher SD Card) SD card reader Windows PC
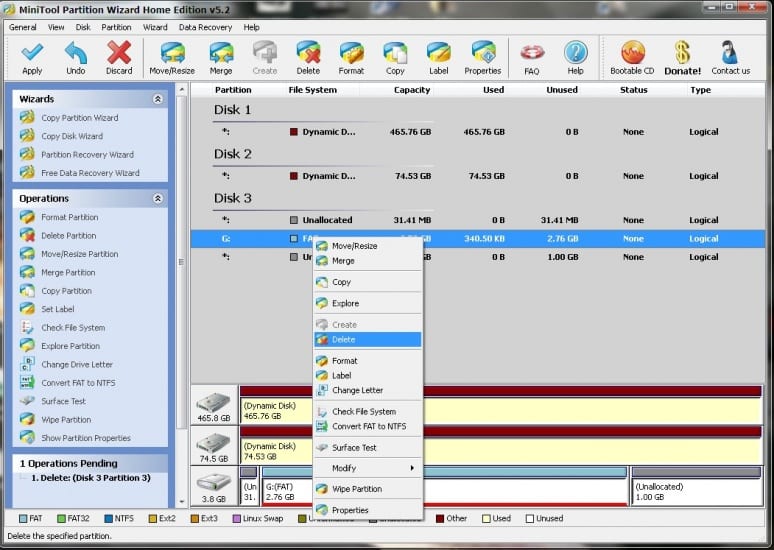
Firstly, you need to divide your SD card. To do that, download MiniTool Partition Wizard from here. Install the application on your PC and connect your SD card to your PC with card reader. Step 1: Open MiniTool Partition Wizard on your PC. Once the wizards opens, click on your SD card and choose Delete option.
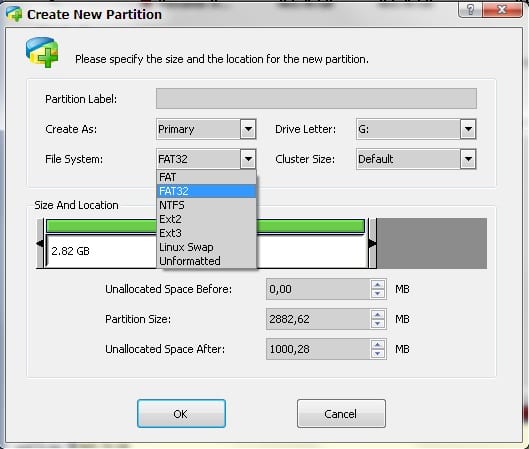
Note: This will format your SD card completely. So, please ensure that you perform a complete backup of your SD card before you proceed with the next steps. Step 2: Once it is successfully formatted, you will have enough space on your SD card as unallocated. Then, right click on SD card and choose “make” option. A popup box will open giving you options for making partition. If SD card is less than 4GB, choose the partition as primary and file system as FAT or if your SD Card is more than 4GB, then choose FAT32.
Step 3: Leave about 512 MB or more space (depending on your choice) for making the next partition. Then choose done and right click on unallocated space of your SD card. Again, click “make” option. Choose primary partition but change the file system to Ext2, Ext3 or Ext4. Note: (Ext2 is not compulsory as most ROMs work fine with it.) How To Make RAM Of SD Card on Android Step 1: Click Apply Changes and then the process continues for few minutes. Now, the partition is completed. Install Link2sd from Google Play Store. Step 2: When you launch the app for the first time, it will require the root permissions and then, it will ask you for the file system of the .ext partition that you had created earlier. Select the option as you had chosen during partition. Step 3: Classify the apps according to size and start linking them. Method 2: Using Roehsoft RAM Expander (Swap) With the help of Roehsoft RAM expander, you can use your SD card as a working memory expansion. This means the more space on your SD card so huge would be your RAM space. Let’s see how we can use it. Step 1: Download and install Roehsoft Ram Expander (Swap) on your rooted Android device. Step 2: After installation is done, open the app and grant it a superuser request. Step 3: Now, you will get to see SDcard memory, Free RAM, Total Free RAM. Step 4: You need to set the new size for your Swapfile. Step 5: Just swipe over “Swap/active” and wait for a moment until the swap is executed. Step 6: Now, choose the path or partition selection for the swap. Simply, select your SD card here. Step 7: Then, go back to the main page and swipe over “Swap/active” and wait until the app finishes creating the swap file. It’s done! You will now notice that your Total free RAM has increased. This is the simplest way to expand RAM using the SD card.

