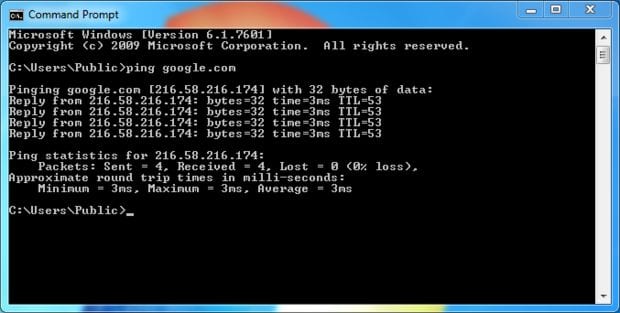
Using Ping First thing to test, is your internet connection. We do this, by using Ping. Ping is a Windows program that comes pre-installed with the OS. It is a text based program and therefore needs text based commands to execute. It’s the software used to test the latency on your connection. For those who don’t know, latency is the time taken to establish a connection between your computer and the web server hosting the website you requested. The first thing to do, is open the Start Menu and search for the command prompt. You can do this by typing “cmd” in the search box and hitting enter. Once you have the command prompt open, you can use Ping to test your connection. Enter the command ping google.com. Once typed, hit Enter and wait for your command prompt to look like the image below. Do note, that the results are not displayed instantly, so you might have to wait a while for the results to pop up. Understanding the results Sent – the number of packets sent to the address; default value of 4 Received – number of packets received from the web address; ideally same as the number of packets sent. Lost – number of packets that did not return from the server back to you; ideally zero Minimum – the minimum time it took for the packet you sent to return back to you (in milliseconds) Maximum – the longest time it took a packet to make the round trip (in milliseconds) Average – this is the average time the packets took and therefore, the lower the average, the better is your connection. An average time of 3 ms is considered very good. What matters to us however, is an unusually higher time taken for the round trip or a large number of packet loss. If this happens, it can point to some issues in your internet connection. If its a physical/hardware issue, its time to have it checked out. If however, that’s not the case then you could try the following steps to boost the speed. While it might not always resolve the issue, at times, users do not get the maximum speed possible from their ISPs. The following steps also use the command prompt and will help you resolve the issue, if it exists. Step 1: Open the command prompt in the way already discussed and type netsh int tcp show global and hit enter. Step 2: The next step is to change the default TCP parameters. Open your notepad and enter the following lines Step 3: Save this file with the name Boostspeed.bat Step 4: Run this file in administrator mode and once the changes take effect, you should notice an increase in your internet speed. Users have reported an increase of upto 35% at times after these steps. Hopefully they might work for you as well. Step 5: Just in case you wish to revert back to the default TCP parameters or have the option to revert back if ever needed, you can save the following lines in another .bat file. Source: Instructables
